PowerPoint is a powerful tool, but I’m often surprised that some of the most useful features are hidden. In another post, I had 29 experts share their best PowerPoint tips, tricks, or hacks.
But here is my personal list of the top 5 tips that would have saved me many, many hours of work over the past few years if I had only known them. I hope you find them as useful as I do.
1. Master shortcuts and hotkeys to cut development time
You probably already know how to cut and paste, but I bet even the most seasoned PowerPoint guru can learn a few things here.
Watch this video tutorial showing PowerPoint Shortcuts You Don’t Know (But Need To).
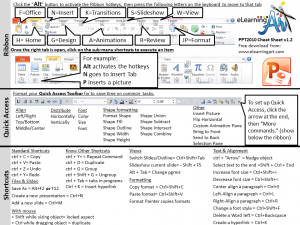
Another overlooked shortcut in PowerPoint is the ribbon hotkeys.

You may not know, but you can activate the “hotkey” shortcuts on the PowerPoint ribbon anytime by clicking the “alt” button on your keyboard. Then you just hit the appropriate key to access that part of the ribbon and another key to execute a command. Here is a video to learn more about hotkeys and the PowerPoint ribbon.
2. Format the Quick Access Toolbar with useful, but hidden, features
The quick access toolbar is a place to put your most frequently used features (and features that are buried in the menus). There are a handful of features that I think are essential to building better content in PowerPoint. You might not even know that some of these features exist. So why not pull them front and center for easy access? In general, I group my toolbar this way:

- Alignment: Alignment is crucial to making your designs look clean. This feature quickly aligns your screen elements.
- Distribution: If you want to space out screen elements evenly, this is a must have feature.
- Font: Quickly control your font selection, color, and size from this menu.
- Shape Formatting: Get the sizing and colors right on your shapes and add some key drawing tools.
- Other: Quickly pull up the missing menus or flip images horizontally.
I’ve created two video tutorials to help you with your Quick Access Toolbar.
3. Trash the built in layouts and build your own in the slide masters

The default layouts are what give PowerPoint presentations a bad name. It’s what causes critics to declare that anything done in the tool is causing “Death by PowerPoint” and cast it aside as a poor communication tool. And that’s not fair. Here are three ideas for creating better layouts in PowerPoint.
1. Start with a blank screen. Think of PowerPoint as a blank canvas. You can paint something on it that looks horrible, but that doesn’t mean that you can’t build something great. The first thing I do when opening PowerPoint create a useful blank canvas. By useful, I mean going into the slide masters and creating a blank screen that has the slide title off of the main canvas. I like to keep the title because the title is pulled into the text of the outline view and into the navigation structure of many PPT-based eLearning tools.
![]()
2. Design open layouts as new masters. When I created my PowerPoint Template Layouts for my retail site, I tried to create a bunch of open, flexible layouts. And I actually designed all of the layouts using PowerPoints built in drawing tools. Open layouts are useful for displaying information (text, graphics, etc).

You can control the background colors from the top level slide and then modify your layouts at the sub-level.

3. Use scenes as your background layouts. Most of the training that I build scenario-based. One of the things I like to do when building scenarios is to put the background environments into the slide masters.

The image above is from the post I wrote on using a PPT-based rapid storyboard with background images as slide masters. This method is really useful if you want to insert characters on top of different backgrounds to create scenes.
The point is that you should think beyond the built in layouts in PowerPoint. It will open you up to a lot of new creative ideas. I created a video that shows some slide master tips here.
4. Open the “Selection and Visibility Pane” to control object names and layers

I always have the “Selection and Visibility Pane” open when I work in PowerPoint. This is the master control for naming all of the elements on your screen, as well as controlling the order of your layers. You can also hide elements on the screen so that you can focus on what you’re currently working on.
I’ve created a helpful video tutorial teaching you how to control layers with the selection and visibility pane.
5. Use Drawing Guides to Align Objects

This is a pretty simple tip. But if you don’t know about it, you probably won’t find it (you need to right click off the main workspace to set it up!!!). Drawing guides and the ruler are critical to aligning objects on your screen. I’ve created a video that show you how to setup guides, grids, and rulers here.
I hope you found these PowerPoint tips useful. If you have any other tips you’d like to share, please enter them in the comments field below.