
Develop and Create eLearning Projects
Real world tips to build better eLearning, faster
ULTIMATE GUIDE TO ELEARNING DEVELOPMENT
- Plan Your eLearning Projects
- Manage Your eLearning Projects
- Structure & Script eLearning
- Design & Prototype eLearning
- Visualize & Storyboard eLearning
- Develop & Build eLearning
- Publish & Deliver eLearning
Bonus 1: eLearning Development Calculator
Bonus 2: eLearning Best Practices Pro Tips

You’ve got an approved script that reads like a dream, a solid design direction developed via a prototype and storyboard, and you’re ready to get going on the fun part: building your elearning program. Let’s get started!
Get our free eLearning Development Tips ebook!
If you’re a building eLearning, this guide is for you. These 10 tips will save you countless hours on your eLearning builds.

Rev Up the Assembly Line!
It’s smart to begin with a calm, collected approach to the work ahead, mentally mapping the sequence of steps. In fact, over many projects, we’ve come to appreciate the efficiency of doing similar tasks together instead of building each slide to completion in a linear order. Thinking of your build more like a product assembly line than a slide-by-slide work effort helps keep the momentum going while aiding in creating a program that looks cohesive from top to bottom.
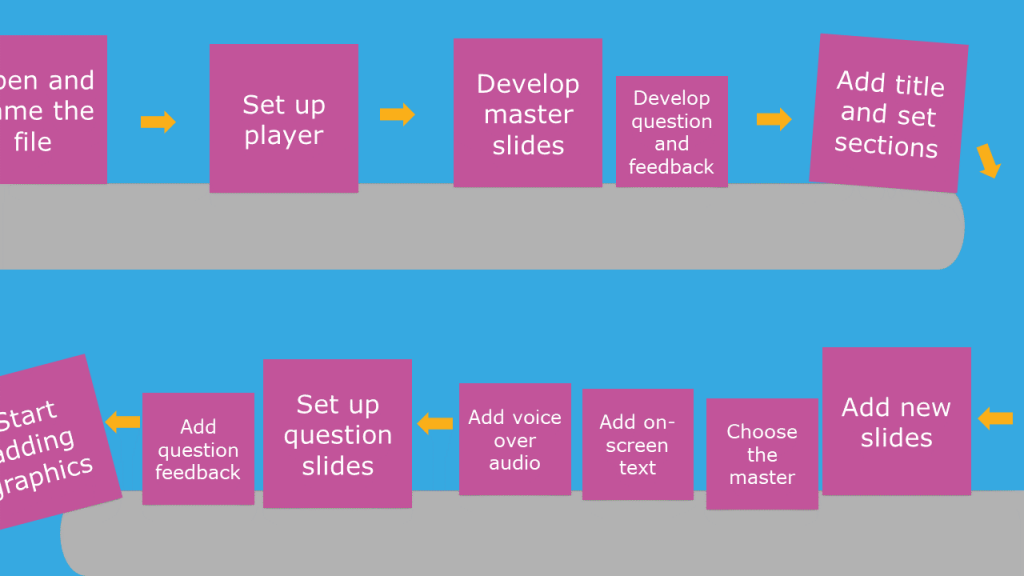
We’ve developed a loose set of steps that helps us get elearning projects built more quickly. Consider following this sequence to get to “done!” sooner:
- Set up a file in the authoring tool that incorporates final decisions around slide size, colors, and fonts.
- Set up the player attributes — will you be displaying a menu? navigation buttons (and which ones)? logo? course title? Get all of these set up.
- Develop a set of well-built master slides that will serve as the basis for all of the slides in the program. Don’t forget to finalize the design of question slides and question feedback.
- Divide the script content into logical, short sections. (Tip: Often sections are part of the script, but if not, you can add section breaks that make sense in terms of development. It is easier to develop shorter sections, and with each completed section, you’ll feel a sense of accomplishment.)
- Add the program title slide and section title slides, if they will be used.
- Using the script as a guide, begin adding all new slides except question slides. For now, focus on just three things for each side:
- Choosing an appropriate master slide (this can be changed later, so make this decision quickly).
- Adding text. Often this will mean copy-pasting the slide title into the title text placeholder and the slide text into the content text placeholder. (Tip: Limit the formatting used in your script and paste the text without formatting onto the slide — you want the slide master to dictate the text style!)
- Mark any slide that will be an interaction — you’ll be returning to these later.
- Add the voice over script text to the slide notes section (another copy-paste task).
- Run text-to-speech audio (TTS). Whether you’re using TTS as either the temporary or the final voice, it’s good to get it in early. (Tip: Are you seeing any slides that are very long — say, longer than 45 seconds or so? Consider whether it would be possible to divide the slide into two. This makes working on the slide easier.)
- Once all of your slides have been placed, add question slides and question-level feedback (if present in your program). Building these can be time consuming, and it’s nice to get them out of the way early.
With those steps completed, you’ve got a complete slide set to work with, and the file is only awaiting the graphics.
Important: Save, Save, Save Your Project (and a Backup)

An elearning file — no matter the tool in which it is built — has the potential to become problematic at any point in the development process. Add to that human error, computer glitches, and other technical “oh noooo” moments, and you can understand why we recommend saving your work often throughout a work session! You may also wish to create a daily backup of the project file, so that you’ll only lose a single day’s work if something should happen. If your computer is unreliable in any way, also consider keeping a backup of the project in cloud storage or on an external hard drive.
Time for the Pretty Stuff!

With your program now fully loaded with slides, text, questions, and audio, you can commence to add graphics, arguably the most fun (and we think the most important!) part of any elearning project. Let’s take a look at a few tricks of the trade here …
1- There’s no need to start at the beginning and build down the sequence of slides from first to last
As long as you can keep track of what slides you have and haven’t completed, you may find that there are benefits from jumping around a bit. For example, if you’re not 100% confident about your graphic building ability, start somewhere near the middle of the program. Return to the first few slides later, when you’ve gotten into the swing of things. (That puts your less confident slides in a spot where they will not be part of forming first impressions.) You might choose to begin with the most tricky slides first — these will typically be interactive slides, complicated slides, and slides or sections you’re just kind of dreading. Doing these early instead of last helps avoid the really unpleasant intersection of time-crunch + low learning curve that happens when such slides are put off until last.
2- Think about simple, repeatable solutions to convey the information
We’re all very familiar with the look and feel of highly-produced video and animation, and may mistakenly hold ourselves to an unrealistic standard. Instead of creating a no-fun building experience, choose attractive visual solutions and look for opportunities to use the same solutions throughout the program. Simple often beats the slower to build complicated options both from a visual and a comprehension standpoint.
3- Consider loading up all your slides with the graphic elements before the neatening up steps.
Collecting, creating, and prepping all graphics at once helps you avoid the stop and start sequence that comes with completing a slide, pausing to search for the next slide’s graphics, then working on that slide, and so on and so on. Pre-loading your slides with graphics lets you search and gather in one session, and tweak and polish in a different one.
4- Avoid the time-consuming search for the perfect photo
Instead of using precious time searching for a single photo that includes all of what you have in mind, employ a library like ours here at eLearningArt, where the emphasis is on graphic components, not completed compositions. For example, you need a photo of a young woman on the phone against a typical office backdrop and she must be shown in a series of reactions across a few slides. Don’t waste your time searching for that, but instead choose an eLearningArt photo cutout character and a photo office background. Then, use the background on each slide and simply swap in the character reacting as needed. (And that’s just a single example, we’ve got lots more ways to make building go better!)
5- Put those master slides to work!
The power of master slides is that you can make a change on a single slide (the master) and have that change appear on every slide that uses the master. Since efficient building is very much a matter of reducing the number of clicks you must make to get a slide done, using master slides is the way to work.
And a Few Things to Keep in Mind
With the information just above, we think you’ll have a pretty easy time building your elearning program. To wrap this up, allow us to pass along a few more tips that we find useful in our own project builds:
- Did we mention the importance of saving your work often and making regular file backups? You are 100% guaranteed to thank yourself later for this simple habit!
- Review your work frequently. Using the preview feature in your authoring tool, take a look at the slides that you’re working on — both alone and in sequence — to detect and fix any issues early.
- Confirm that navigation and course sequencing is running as expected. Little gremlins can wreak havoc with the sequence of your slides. Best if you detect that ASAP, and don’t leave it up to your reviewers to point out the issue.
- Be a bit of a perfectionist (where it counts the most). You’ll come up with your own list, but here are some things we allow ourselves to be picky about:
- Checking slide timings to ensure that on-screen activity matches the audio.
- Employing the same approach to text elements like bullets, line spacing, font size, and so forth across the program.
- Setting photo and illustrated characters on the slide in a way that doesn’t cut them off in awkward spots (for example, through their faces or at the ankles).
- If something will be on more than one slide in the same spot each time, confirm that the objects’ positions match exactly using the size and x and y location settings.
- Making sure question slides are consistent in text size and location (for both the question stem and answers), and that they display consistent feedback.
- Commit to getting slides “as final as possible” even in the earliest drafts. Think of it this way: each slide that meets with stakeholder approval in an early review is a slide you don’t need to work on again. Why not get as many slides to that spot as early as possible?
In Conclusion
Once you’ve gone through the building process, you will be able to proudly share your program with stakeholders. In the next section of this development guide, we’ll go into more detail about this.
Until then, have fun putting together a program that doesn’t just tell your audience about something but instead compels them to tune in, watch closely, and care. It’s all in the build, and you’ve got what it takes to make it happen!
eLearning Build and Create FAQs
The answer to this question depends on many factors, so it’s difficult to pin down a single estimate. Simple elearning programs can be executed on a rapid turnaround of a few days, but others, especially those with multiple modules, technical subject matter, and several stakeholders, will take months. As such, well before determining how long it will take to create a given program, it’s important to define the scope of the program, understand learner needs and requirements, develop a sense of how sophisticated the final deliverable must be, and get to know your stakeholders’ requirements, expectations, and involvement in the program.
We’re not in a spot to take sides on the elearning software question because we find that all elearning software does a solid job delivering on the promise of making it possible to build good looking programs and publish for online delivery. Some learning management systems (LMS) offer in-program development apps, too. Be sure to take a look at this option, so you’ll know what’s possible there. If you have the opportunity to make a choice of authoring tools, we suggest that you try out each tool using free trials until you determine which one feels right for you. Then, after you’ve decided, make the most of the community support offered for the tool. You’ll learn a lot by following the discussions you’ll find there.
Yes, you can. You’ll be able to create attractive and informative slides quite easily in PowerPoint, and can publish your final program to video, PDF, and other file types. To publish from PowerPoint to a file suitable for a learning management system (that is, a SCORM-based file for an LMS), you’ll need a PowerPoint add-in such as iSpring, Articulate Studio, or Adobe Presenter.
There are many Internet sources for graphics, but we find that searching for just the right thing eats up project time. Instead, consider becoming a member of a dedicated library of elearning assets like the one offered by eLearningArt. We offer a large and growing collection of templates, cutout photo characters, illustrated characters, and graphic elements, and everything is curated specifically for use in elearning and slide-based projects. This is a real timesaver and lets you build better projects faster.
