Storyboard Your eLearning Projects
Free eLearning Storyboard Template for Better, Faster, Instructional Design
ULTIMATE GUIDE TO ELEARNING DEVELOPMENT
- Plan Your eLearning Projects
- Manage Your eLearning Projects
- Structure & Script eLearning
- Design & Prototype eLearning
- Visualize & Storyboard eLearning
- Develop & Build eLearning
- Publish & Deliver eLearning
Bonus 1: eLearning Development Calculator
Bonus 2: eLearning Best Practices Pro Tips

Every elearning project needs a plan, and when you create an elearning storyboard, you’re taking that plan to the next level! Although not a requirement for every situation, storyboarding during your instructional design process can be an important step in aligning material, stakeholders, and development before the clock starts running on slide building.
In this article, we’ll get you started in the right direction for producing a storyboard that helps you build your next elearning or instructional design project quickly and efficiently. Let’s start with the what, who, when, where, and why of elearning storyboarding. After that, we’ll take a close look at how to create an elearning storyboard.
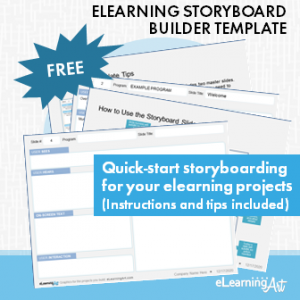
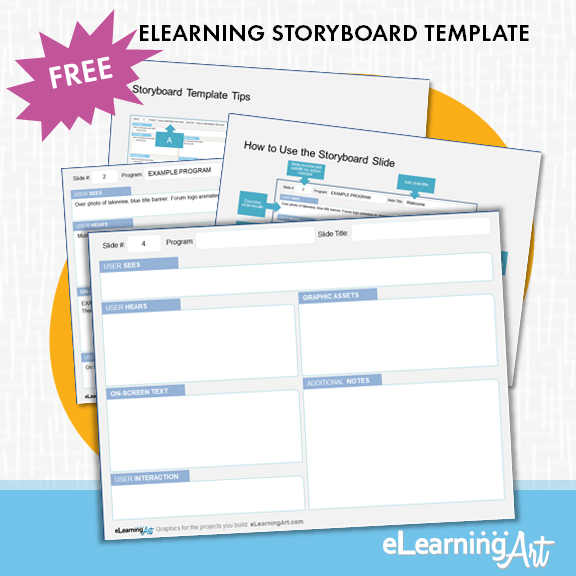
Get our free eLearning storyboard template today!
One of the best ways to start storyboarding is to skip the formatting and jump straight into it with a pre-formatted PowerPoint template. Instructions and tips included!
Storyboards for elearning and instructional design: The basics you must know
What is an elearning storyboard?
In multimedia fields such as movies, TV, animation, and elearning, a storyboard is a document that provides direction for the development of the desired end result. For example, in elearning, a storyboard provides slide-specific information about things like the graphics that will be used, the voice over and on-screen text, and interactions that may be present.
As the spot where thinking happens before production begins, the storyboard:
- Lays out the flow and sequence of the program based on a script
- Shows what will happen slide by slide
- Provides cues for those who will actually do the production steps
Who produces an elearning storyboard, and who is it for?
Typically, an elearning storyboard is produced by an instructional designer. Though some organizations have instructional designers who exclusively focus on storyboarding, usually the same person (or people) involved in distilling source material into a program script will be tasked with developing the storyboard.
The storyboard serves different audiences. It can be shared with stakeholders, subject matter experts (SME), and others with an interest in the final outcome of the project build. In this case, the storyboard may be used as an approval document or just as a point of discussion to make sure that everyone agrees to the approach.
The storyboard is also important for the people involved with building the program, because — think “blueprint” — it shows exactly how to complete each slide.
When should you produce an elearning storyboard?
A storyboard serves as part of the process to get from the idea of producing an elearning program to the final published and delivered result. It is most often executed early in the project sequence, but after the initial process of researching the topic, distilling subject matter-related source material (and SME inputs) has resulted in an approved script.
Where is an elearning storyboard produced?
This is one of those questions that has to be answered with “It depends.” If you are working alone, you may find that a script with annotations about the on-screen text and the graphics you have in mind will be sufficient to storyboard your program. On the other hand, if you’re working with others to develop the program and specific graphics and interactive elements must be worked out, you may want to develop your storyboard in an app that has strong graphics and text capabilities, such as PowerPoint, Keynote, or Google Slides. If you’re developing the storyboard in one of these slide-based programs, plan on using one storyboard slide per slide in your program.
Sounds like it’s a lot of work! Why create an elearning storyboard?
The best reason to create a storyboard is to ensure that the majority of details about a program have been considered before the time-consuming activity of program building begins. The process of building a storyboard compels a detail-oriented, holistic view of the program that can result in greater consistency across the build. In addition, the storyboard puts all script, design, and mechanical details in one place, giving everyone involved a single document to reference and respond to.
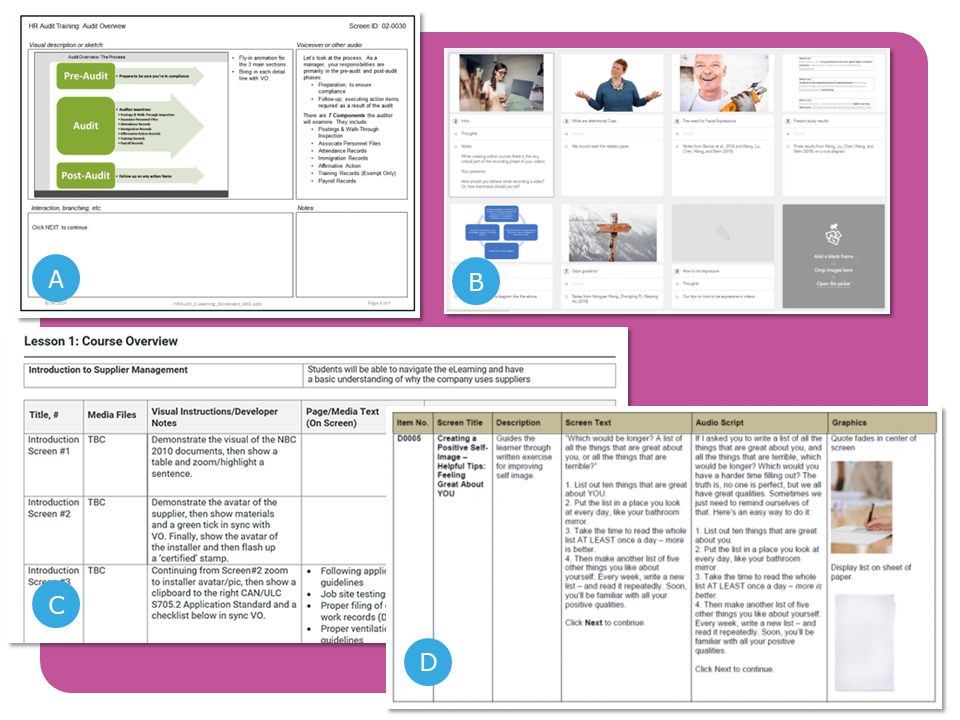
Example slide-based storyboard
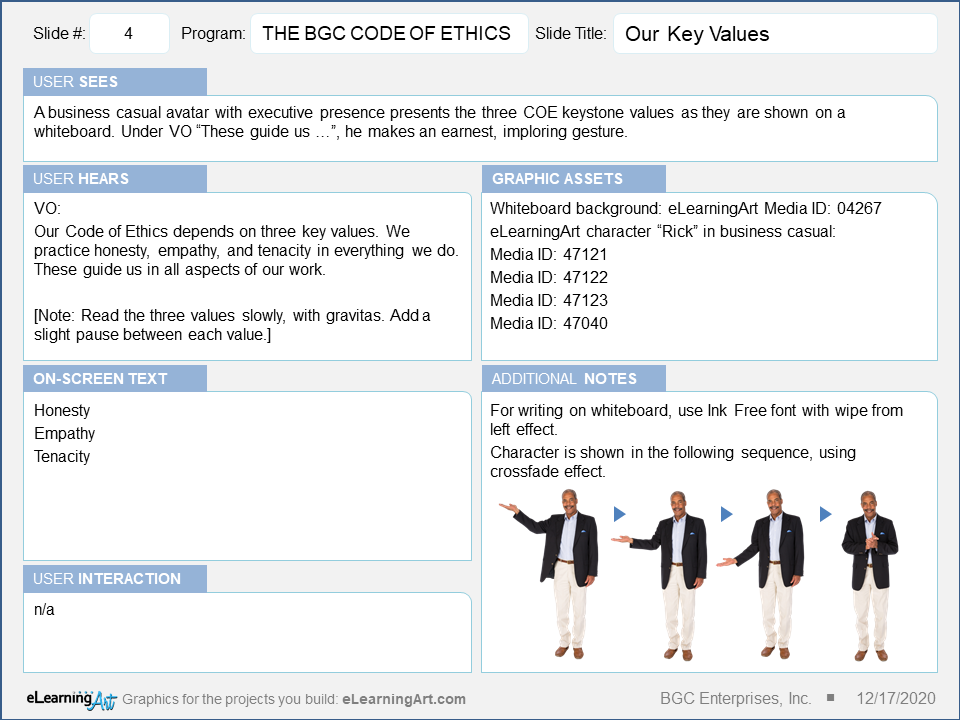
To put it simply, an elearning storyboard is a blueprint for program production, integrating the script with descriptions of what will happen on screen. For example, shown left is a storyboard slide created with the free storyboard template we’re offering in this post.
Other storyboard examples
A storyboard can be produced in any tool that works best for you. At right, we show a few examples from around the web.
Sources:
A – Jackie Van Nice
B – LearnWorlds.com
C – iSpring Solutions
D – Learn2Engage
How to create and build an elearning storyboard
If you’ve decided (or been asked or told) to create an elearning storyboard, rest assured that the process can be both simple and enjoyable. The trick is to follow a sequence of steps, which we’re going to lay out for you here.
1. Gather project elements.
Your storyboard bridges the gap between the scripting (or words-related) elements of your project and the visual and graphics aspects. As such, it’s a good practice to have both of these in pretty good shape before commencing to storyboard. Ideally the following items will be completed, approved, and ready to work with:
- A completed script. If your program will have live voice over or text-to-speech, this will be the spoken script. If the program is read-only, the script will be synonymous with the on-screen text.
- Any must-include material. This could be anything, really, but examples include tables, charts, videos, etc., in addition to any resources that may be attached to the program.
- A design style guide. Here, you will likely use an existing organizational style guide that specifies colors, fonts, and logo usage. If a style guide isn’t available, create your own — define the color palette, the font (or fonts), and any other on-slide elements.
- A design prototype. Elearning projects don’t always include a design prototype, but they should! Here, material similar to that which will be in the program is mocked up in the development application. A design prototype typically works out the look and feel of different slide use cases and often results in a full set of master slides to be used in the program.
With all of these things handy, the storyboarding process will proceed more rapidly.
2. Discuss the storyboard with the people who will be using it, and confirm what they need to see to understand the building plan.
A storyboard includes a lot of information, and can be confusing for people unfamiliar with the format, so get everyone on board early! Think about the people such as:
- Your stakeholders who may need to review and approve your storyboard
- Your SME(s) who may need to review the words and graphics for accuracy
- Your builder(s) who need to understand what you have in mind as the end result
Building a storyboard takes time, so make sure that you are creating a rich document that will be useful for those who will be interacting with it.
3. Let people know what a storyboard is for and clearly define what can (and cannot) be revised in your storyboard.
Before launching the storyboarding activity, ensure that everyone understands the purpose of your storyboard and their role in its development. Make sure that you communicate clearly about what can and cannot be changed when anyone takes the time to review or work with the storyboard. This will save people time and reduce the frustration that comes from having made changes to something that shouldn’t have been revised. For example, this might happen when you pass along a storyboard based on a script that’s already been reviewed and approved by your company’s legal department. Make sure that everyone who engages with the storyboard understands that the script is “locked” and not changeable. Similarly, make sure that when the storyboard is delivered to an elearning developer, they clearly understand where they can and cannot deviate from the storyboard as they build the program.
4. Choose (or create) a storyboard template that makes the job easier.
Ultimate List of 111 Free eLearning Storyboard Templates in Word, PPT, and PDF
Every elearning project benefits from thinking through the repeatable elements and storyboarding is no different. A good storyboard template lets you quickly specify the key pieces of every slide in a program and it does so by defining the main slide components.
Note: If you’d like to bookmark or link to this page and jump directly to this up-to-date and verified list of 111 storyboard templates, use this link.
Here are our favorite storyboard template resources:
- eLearningArt free storyboard templates [last verified 08/07/23]
- eLearning Coach storyboard resources [last verified 08/07/23]
- Articulate Hero Downloads Community [last verified 08/07/23]
- Articulate Hero Challenges: Lots of great templates and process explanations, but since linking externally, some links are broken. Still a resources worth checking out. Plus, if you have your own template to share, you can add it there. Check out challenges #251 and #48.
Here are links to external elearning storyboards that we’ve verified, and you can download directly without signup.
Featured
- Instructional Model Driven Google Sheet [Download Link | Source: Thinkific]: 7 tabs with different storyboards in it that follow different instructional models, such as: Bloom’s Taxonomy, Gagne’s 9 Events of Instruction, ADDIE, SAM, Merrill’s First Principles of Instruction, Action Mapping, 70-20-10, and Backwards Design. [last verified 08/07/23]
- Storyboard Bundle [Download Link | Source: David Becker] 14 different storyboard types for different uses. Includes: Branching pathway, click bullet reveal, click chooser, click image reveal, click image select, drag to complete, drag to order, matching pairs, short answer reflect, slide reveal, switch to reflect, text left media right, text top media bottom, text validator. [last verified 08/07/23]
Reliable
These files are hosted by us (eLearningArt) so the links shouldn’t break.
- Christy Tucker [Download Word Doc] [last verified 08/07/23]
3rd Party Site Links
More direct link storyboard resources, hosted by others and verified 8/7/23:
- Teresa Vanderpost [Download PDF |
- Krishna Kalva [Download]
- Joe Waddington [Download Word Doc]|
- Jane E. MacKenzie-Smith [Download 1, Download 2]
- Jackie Van Nice [Download PowerPoint | View Article]
- Mike Palmer [Download]
- Daniel Adeboye [Download Word Doc | View Article]
- Rod Ward [Download 1, Download 2, Download 3]
- Mykhaylo Zakryzhevskyy [Download | Format: Google Doc]
- Anouk Van Dijk [Download | Format: Excel]
- Andrew Geaghan [Download | Format PowerPoint]
- Kelly Hamer [Download]
The following storyboards are hosted on external sites and are “gated,” meaning that you need to exchange your email for them, or you need to log into their sites.
- eLearningArt Storyboard Template (free via email signup)
- Articulate Community Storyboard Downloads (requires free Articulate community account): 14 downloadable storyboards in different formats.
- iSpring Storyboard Templates (free via email signup) [Download PowerPoint version | Download Word version]
- Idol Courses (free via email signup)
- Maestro Learning (free via email signup)
Create Your Own Storyboard Template
For each slide in the project, the same questions are answered. A typical elearning storyboard will prompt you to answer the following types of information for each slide. Here are the 5 things that should be included in every storyboard:
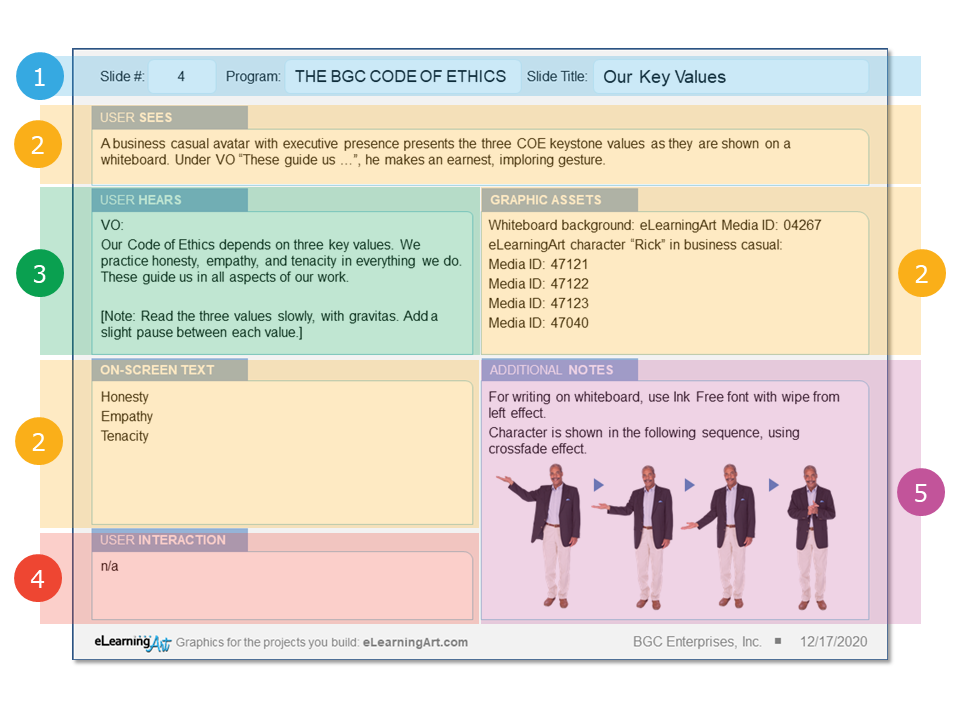
1: Slide identifiers (1, blue area) – Slide number, program name, and slide title
2: What the learner sees (2, yellow areas) – Description of visual flow of the slide, on-screen text, description of graphic assets including characters, videos, and other graphic elements
3: What the learner hears (3, green area) – Voice over script, music, and any other audio that may be present on the slide
4: User interaction (4, red area) – Description of any interactions that may be present on the slide, navigation-related elements. For quiz questions, include question stem, responses, and feedback for correct and incorrect answers. In addition, include number of tries and any scoring information required.
5: Additional notes (5, purple area) – Information useful for stakeholders and/or developers – this can be text or graphics, as needed
Note: The free template we’re offering here includes a simply styled standard slide in addition to the form style shown here. Use that style of slide to deliver information in greater detail and refer to it on the main entry for that slide.
5. Complete your storyboard.
Now, pull together all of the pieces, and for each separate slide in your final program, create a storyboard slide. Some storyboard slides will be simple. For example, the storyboard slide for a project section title slide will likely show just the title text and the specified master slide. (A repeatable, easy win!)
On the other hand, some storyboard slides will require more thinking and ingenuity. Maybe you’re including character-based scenarios in your program (which is something that’s recommended by elearning experts, by the way). The storyboard slides for a scenario may require working out what characters will be doing on each of several slides (think: “dress rehearsal” for your scenario slides).
Worried about how much time this will take? Well, in our experience, an understanding that some slides will be quicker to storyboard than others means we can relax when some slides take longer! It’s helpful, too, to remember how much more quickly the actual building of the elearning program will go on account of the many decisions that are made during the storyboarding stage.
6. Review your storyboard and share it with others.
When your storyboard addresses the entire script and incorporates all required graphics, add-ons, and videos, you are almost done. As a last step, review the storyboard and ask yourself questions like these:
- Are similar project elements always treated consistently? (For example, do all sections begin and end in the same way? Do repeated slides use the same formatting?)
- Are titling, numbering, and other text-based elements consistent across the program?
- Have you marked any element that cannot be revised? Or, on the other hand, if your storyboard will continue to be revised, have you marked elements that are not yet settled and require more input?
With all of these steps completed, you’ll be well on your way toward developing a very strong elearning program!
Now it’s time to shave off some time on eLearning development.
eLearning Storyboard FAQs
There is no requirement or preset format for an elearning storyboard, and many developers work directly from a text-based script to build program slides without the help of a storyboard. Storyboarding does have the advantage of allowing a set of design and visual decisions to be made all at once instead of on a slide-by-slide basis. A storyboard can be a place for trying out ideas more rapidly and efficiently than would be possible in the slide-building environment.
The process is straightforward: For each slide in your program, think through what will be present on the slide in terms of script, on-screen text, graphics, audio, and interaction. Capture that thinking either informally or formally using pen and paper, PowerPoint, or another tool that allows you to work quickly with both text and graphics.
It doesn’t have to take log to create a storyboard for elearning if it is just for your own reference as a developer. Simple stick figure sketches will get the job done. If you’re creating a more formal storyboard that will serve as a review document for stakeholders (gotta look good!) or as a guide for another person or team executing the program build, you should plan on spending nearly as much time on the storyboard as you did on the scriptwriting.
Since there is no preset format for an elearning storyboard, details about what might be included are pretty open-ended. For some people, simply printing out the script and sketching with some markers creates a document that serves as a guide for building. For others, the storyboard may be a required (or expected) step in the stakeholder review process. In that case, it is helpful to show what will be happening on a slide — the script for the slide, the on-slide text, notes about any user interactions that may be present, and, of course, graphics that show what will appear on the slides.
Interestingly enough, effective storyboards — especially if they will be reviewed by stakeholders — are simple storyboards. Clear visualizations with a minimum of question-raising details will help decision-makers stay focused. For example, a storyboard that says “character may appear in color or grayscale” will be confusing. Instead, make a decision, stick with it, and show only characters that match your choice. In general, effective storyboards are the ones that convey your great ideas for a program and “sell” them a little, too, so make your storyboard a good messenger for your project.